SMALL PRINTER. BIG IDEAS.
A good print starts
before the first sheet.
A practical guide to paper, scale and turning your PDF into one connected poster.
Opened from the workbench? Keep that original tab open: your unsaved poster stays there. This guide does not save or change it.
Your path from PDF to wall
- 01
Choose paper
Match the PDF paper to the paper in your printer.
- 02
Check the size
Review the assembled dimensions, sheet count and marks.
- 03
Print a test
Use 100% / Actual size. Measure the calibration square.
- 04
Trim the edge
Cut away the blank border at the artwork boundary.
- 05
Align overlap
Match the repeated artwork; the strip appears only once.
- 06
Join the rows
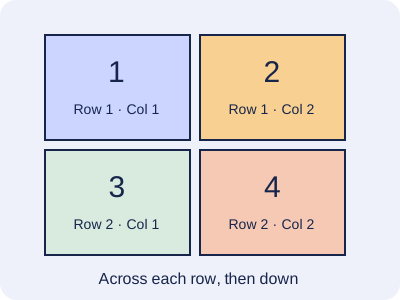
Work left to right, then down. Tape from the back.
01 / PLAN
Paper size is not poster size.
Paper is each physical sheet. Finished size is the artwork after trimming and joining. Set both in step 2. Portrait and Landscape rotate the paper, not your artwork.
Width and Height preserve the artwork’s proportions. Custom width & height offers Keep all artwork (white space) or Fill poster (cropped edges). Neither stretches the artwork.
Margins leave a blank border for the printer. Overlap repeats artwork inside adjoining tiles so you can align them. In Paper count mode, both affect the finished size. In Finished size mode, the size stays fixed and the sheet count may change.
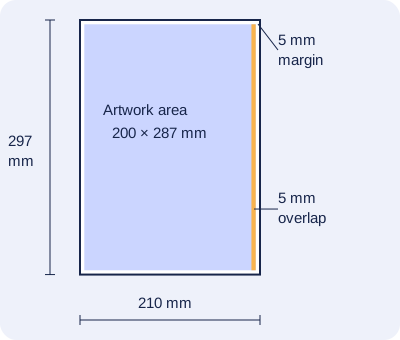
A real two-column example
A4 portrait with 5 mm margins gives 200 mm of artwork width per sheet. With 5 mm overlap, two columns cover 200 + 200 − 5 = 395 mm. The artwork’s proportions determine the height and number of rows; two columns does not necessarily mean four sheets.
For a fixed 395 mm width and a 1600 × 2000 source, the finished height is 493.75 mm. The final row uses only the part needed to reach that exact height.
| Paper | Width × height (portrait) |
|---|---|
| A4 | 210 × 297 mm |
| US Letter | 215.9 × 279.4 mm · 8.5 × 11 in |
| Philippine Long | 215.9 × 330.2 mm · 8.5 × 13 in |
| US Legal | 215.9 × 355.6 mm · 8.5 × 14 in |
Long and Legal are different. A2 and other large sizes require compatible printer hardware. Selecting a size here cannot make a printer feed it.
02 / CHECK
Measure one page before printing them all.
- Download Calibration PDF using the same paper and orientation as your poster.
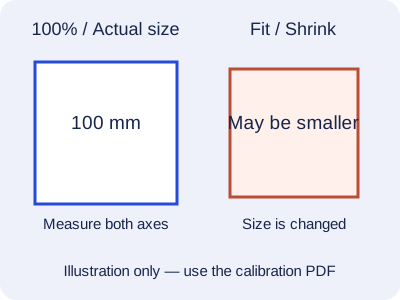
- Open it in a PDF app. Select that paper, one PDF page per physical sheet, single-sided printing and 100% / Actual size.
- Turn off Fit, Shrink, booklet and multiple-pages-per-sheet. Borderless modes can enlarge the image; check the printer settings.
- Measure both sides of the calibration square with a ruler. It is normally 100 mm; on small custom paper, use the dimension printed on the calibration page.
- Print one poster sheet next. Check that the artwork and any marks are inside your printer’s printable area.
If the test is wrong, stop and correct paper, scaling or margin settings. Do not compensate by stretching the artwork.
03 / ASSEMBLE
Trim white paper. Keep matching artwork.
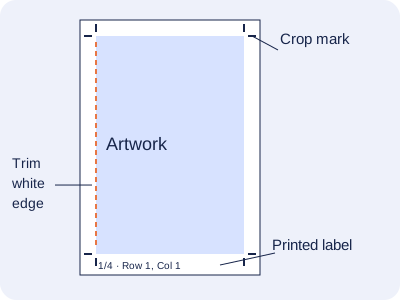
Lay the sheets out using the Assembly map. The map is a placement guide, not actual size. Keep the printed labels until you know each sheet’s place.
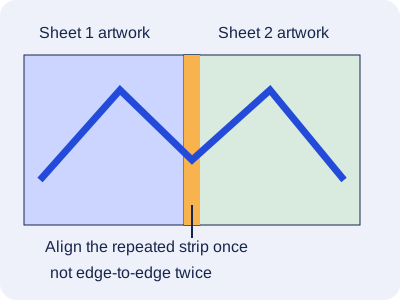
Trim a joining sheet’s blank border at the artwork boundary, using crop marks if enabled. Place it over the adjacent sheet so identical details in the repeated strip line up. Do not join two copies of the overlap edge to edge: that would repeat the detail and make the poster too wide.
Check alignment before taping the back. Join one row at a time, then join the rows. Trim outer white borders last. If overlap is zero, the artwork edges must meet precisely; there is no repeated strip to help.
QUESTIONS & FIXES
Find the reason, then the next step.
Where is my downloaded PDF?
A successful export starts your browser’s download. Check its Downloads list or folder; a browser may ask you where to save it. “Download started” does not confirm that the file was saved or printed. Poster PDFs are named posterweave-N-sheets.pdf; the name reflects the downloaded sheet count. If generation failed, the page shows an error. Retry after correcting the cause; do not close the tab while preparing the PDF.
Why is the print smaller than the finished size?
Check the physical paper selection and print scale first. Fit, Shrink, multiple pages per sheet and borderless enlargement can alter scale. Print the calibration PDF and measure both axes. The PDF’s physical dimensions do not depend on screen zoom. If your mobile print app cannot set actual size, use a desktop PDF print dialog that can.
Why is artwork missing at the paper edge?
The printer may have a wider unprintable border than the margin you selected. Increase the margin enough for that printer and regenerate the PDF. For a fixed finished size, this may need more sheets. Check the one-sheet test rather than using Fit to disguise clipping; Fit changes the intended size.
What changes when I choose Clean print?
Only Crop marks and Printable page numbers turn off. Artwork size, paper, margin and overlap are unchanged. Each switch can be enabled separately afterward. Screen grid numbers remain visible as assembly guides and are not printed just because you see them on screen. Single sheet in the large preview reflects the printable marks; the Assembly map remains numbered.
Why are page numbers or crop marks missing?
The two switches are independent. Page numbers are omitted when margins are below 3 mm, even if their switch is checked; the download check explains this. Crop marks require at least a 3 mm margin and block export if that requirement is not met. Restore a sufficient margin or turn crop marks off. Inspect a single print sheet before exporting.
Why do the last row or column contain partial artwork?
The output stops at your exact finished dimensions. A final tile can therefore use less than the available sheet area. This is expected, not an extra crop or a scale error. Paper count keeps the source proportions; choosing two columns does not force a two-by-two grid. Custom width and height can add white space or crop the edges, but do not distort the source.
Will PDF or SVG artwork remain vector?
Supported PDF content and SVG paths can stay vector, including in supported multi-layer compositions. Supported editor text becomes vector outlines, so it is not searchable. Some SVG features, unsupported text or artwork effects use a raster composition instead. Read File & print quality details for this project’s actual export plan. A scanned page or bitmap inside a PDF stays an image; a PDF wrapper does not create detail. PDF comments and form annotations are omitted.
Why does my large poster look blurry?
A source image has a fixed amount of detail. Increasing its physical size reduces pixels per inch. The tool shows a quality warning where appropriate, but that estimate cannot judge the content or viewing distance. Use a larger original or a smaller finished size. Effects and Gentle contrast enhancement cannot recover missing detail and do not guarantee lower ink use.
Which files can I use?
JPG, PNG, WebP, GIF, PDF and supported SVG files, up to 25 MB per file. GIF uses one frame captured during decoding; the first frame is not guaranteed. Animation is not printed. HEIC needs conversion to JPG or PNG first. The app limits source images to 40 megapixels, working images/canvas to 8 megapixels, projects to 20 layers, output to 100 sheets and poster dimensions to 5 metres. Complex compressed images or PDFs can still exceed browser memory. External SVG fonts/images and unsafe SVG content are rejected.
Can I choose another PDF page or combine pages?
Choose a PDF source page using PDF page to use; one source page becomes one poster. Use the optional editor to add images, text or PDF layers. The editor can replace a selected PDF layer’s source page. Replacing the main artwork starts a new composition; use Add image / PDF in the editor when you intend to keep existing layers.
Can I reprint just a damaged sheet?
Open Reprint specific sheets in step 3 and enter original page numbers or ranges, such as 1, 3-5. Leave it blank for all sheets. The numbering refers to the full poster, not the position in the smaller reprint PDF. Invalid or out-of-range selections block the download until corrected.
What if importing or preparing the PDF fails?
Read the displayed error before retrying. An invalid replacement file should leave your previous artwork available. Password-protected PDFs need an unlocked copy. For memory problems, use smaller sources, fewer layers or fewer sheets. Cancel preparation stops that export job; it does not remove your poster. Do not interpret a downloaded file as proof of physical printer compatibility.
Will my unsaved poster survive navigation?
Guide, Feedback and other-page links from the workbench open a new tab so the original stays open. Returning to that original tab preserves its in-memory poster. Closing or reloading it can lose changes. To save a copy, open Manage saved project in step 1 and choose Save. Restore loads that saved copy; Clear saved copy deletes it without removing your open poster. Automatically save & restore on this device is optional and starts only if you enable it. Restoring replaces the current poster after confirmation when there are unsaved changes. Browser cleanup and private browsing can remove stored projects.
Where do my artwork and feedback go?
Artwork processing and PDF generation happen in your browser. Optional GA4 usage analytics can run on the workbench after you allow it there. This guide and the Feedback page do not load analytics SDKs. Saving on device uses this browser profile; other people using the same profile may restore it. When you submit feedback, Cloudflare Turnstile checks for automated submissions and Resend delivers your message to the site operator. Upstash stores hashed network identifiers, counters and submission status to limit abuse, not your message or artwork. Shared networks share a limit of 10 submissions per UTC day. Your draft stays in this tab until you submit; closing or reloading can lose it. No artwork is attached. If sending fails, copying your message does not send it. See the Privacy policy for details. Hosting access logs still occur.